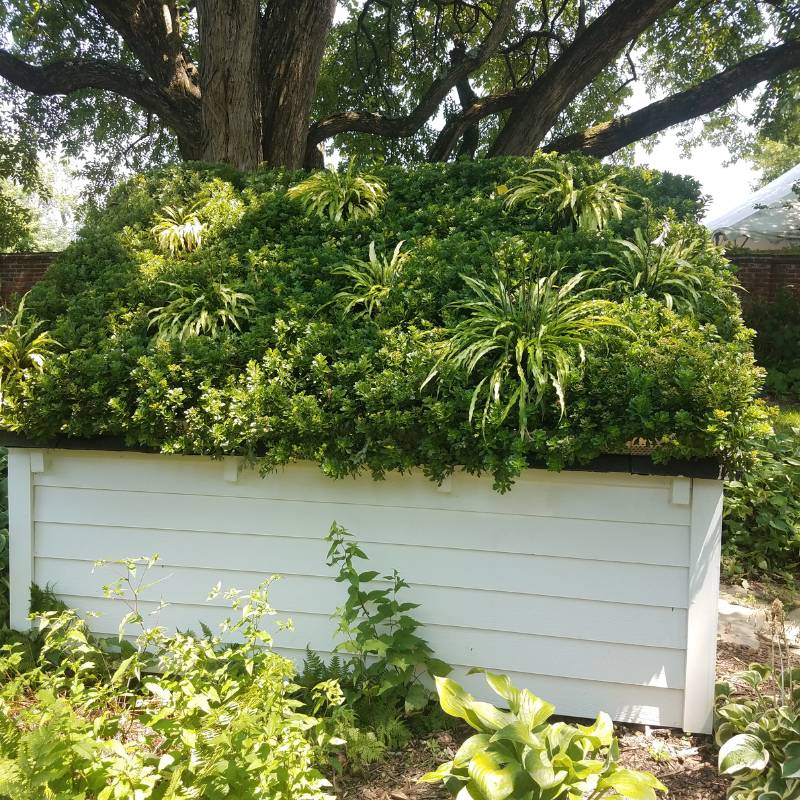
Making a green shed roof
Green shed roofs are gaining popularity in the UK due to the host of benefits they bring, especially in urban areas. With the rise in extreme weather conditions, green roofs offer an eco-friendly method for safeguarding sheds and outbuildings. They not only provide urban wildlife with a habitat, but it also transforms your window view from a drab shed roof to lush greenery.
In this gardener’s guide, we provide step-by-step instructions on how to install a green roof on your shed in just one day!
Contents:
- What is a green roof
- Different types of green roofs
- How to build a living shed roof
- Step-by-step guide to making a green shed roof
What is a green roof?
Green roofs consist of a thriving layer of plant material that cover the roof, transforming the building’s roof into a lush habitat. This green and natural cover not only benefits wildlife, but it also plays a crucial role in mitigating rainfall and flood risks. To avoid heavy maintenance and for it to thrive, green roofs will need adequate drainage and a substrate or growing medium!
Different types of green roofs
Lightweight Extensive
This is the most basic roof type and is very low maintenance – typically uses sedum plants.
Extensive
This is one up from the lightweight version – typically uses sedum, and wildflower plants.
Intensive
This rooftop feels more like a garden in the sky, featuring a combination of ornamental plants, herbs, and compact shrubs – typically requiring professional input.
How to build a living shed roof
Whilst we’re outlining the steps to make a living shed roof, if you intend to install a green roof on your shed or garage, it’s highly advisable to seek expert guidance – it may involve specialised drainage and protective layers beyond the typical knowledge of most casual gardeners!
Prior to adding a green roof to your shed, it’s essential to check that the shed’s roof can actually withstand the extra load. If you haven’t already bought a shed, opting for a reinforced shed would be recommended, or if you already have a shed, you can reinforce and brace the internal structure and roofing joists before starting the green roof project.
Step-by-step guide to making a green shed roof
Making a green shed roof will take you roughly 8 hours, so it can easily be split down into a weekend’s worth of work!
Step 1 – Preparation and safety
Make sure your shed is strong, waterproof, and can support the weight of the green roof before moving forward. A typical lightweight green roof typically weighs between 60kg to 150kg per square metre, and this weight increases when it’s soaked with rain or covered in snow. If you have concerns about your building’s structural load capacity, it’s recommended to consult a structural engineer or architect before you commence.
Step 2 – Angle of roof
Green roofs can be implemented on both flat and pitched shed roofs. It’s recommended to choose roofs with a moderate slope, around 10° is ideal. However, in cases where the roof has a steeper pitch exceeding 20°, ensure the installation of a frame to prevent any possible slippage of the green roof.
Step 3 – Building a wooden roof frame
Once you’ve prepared, you’ll need to start constructing a tanalised wooden frame to your shed roof. Build a frame using rot-proof wood or lightweight metal, ensuring that it matches the depth of the substrate (soil), which is typically a minimum of 100mm. You can assemble the frame by either nailing the corners together or using ‘L’ brackets to form secure corners. This frame will not only keep the substrate and plants in place but also facilitate proper rainwater drainage to prevent waterlogging.
For effective roof drainage, make sure to add drainage holes to the side of the frame closest to the ground or maintain a 10mm gap between the roof and frame. Extensive green roofs, ideal for plants like sedum, wildflowers, and herbs with shallow root systems, do not require significant depth. As a general guideline, maintain a minimum soil depth of 100mm, which may consist of 60mm of substrate (soil) and 20mm of pre-vegetated mats.
Step 4 – Attaching the roof frame
Galvanised screws are rust proof, making them ideal for a water-bearing green roof. Pre-drill pilot holes, so you don’t split the wood.
Step 5 – Adding a waterproof membrane
With the frame securely in place, take measurements and cut a waterproof membrane or a piece of pond liner to the frame’s exact dimensions. This membrane is crucial for establishing a fully waterproof seal over the existing felt roof.
Use a heavy-duty staple gun to carefully fasten the waterproof membrane to the frame’s interior, effectively establishing a waterproof subframe within the main frame. This design ensures efficient drainage for water that passes through the sedum, preventing the sedum from holding moisture during poor weather.
With the waterproof layer securely in place, proceed to install the final section of the front frame (be sure to leave the front waterproof membrane extending beyond the edge of the roof felt!).
Step 6 – Adding a protective fleece liner
Add a plant protection fleece, which can be easily obtained in roll form from your local garden centre, to shield the pond liner during the assembly process – this liner should be the same size as the waterproof membrane.
Step 7 – Adding substrate
Apply a 2cm layer of growing substrate evenly over the plant protection fleece and frame. Ensure that the growing substrate has low nutrient levels and refrains from using compost or topsoil – if you want to find out what topsoil is good for, read our guide here.
Step 8 – Get planting
You can choose between purchasing pre-vegetated mats or planting directly for your green roof. For a sturdy and wildlife-attracting rooftop garden, opt for sedum plants, herbs, wildflowers, and grasses. Be mindful that the plants at the top of the roof will have less access to water compared to those at the bottom, so take this into account when planning your planting or sedum placement.